Usage
This page walks through EuroScope in a typical control session: opening the profile, connecting to the network, reading the screen and the tags, working with the lists and closing the session. It assumes the installation is already done. The shortcuts mentioned here are detailed in the Command Guide.
About the illustrations
Figures marked as illustration are simplified drawings that use the colors of the VATSIM Brasil profiles. The exact window layout and fields may vary with the profile, the plugin versions and each controller's preferences.
Before you start
- EuroScope installed, with the sectorfiles of the FIR you will control.
- TrackAudio installed and configured.
- vATIS configured, if the position is responsible for the ATIS.
- The position's SOP reviewed (aerodromes, terminals or centers).
Opening the profile
When EuroScope opens, choose the profile file (.prf) of the FIR you will control. Each FIR has two profiles:
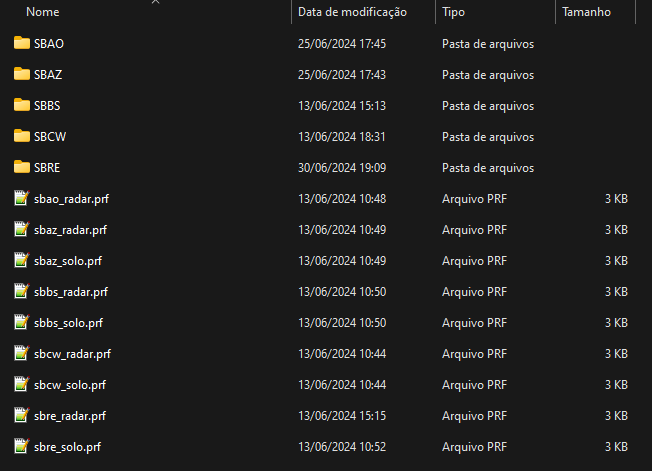
| Profile | Positions | Main plugin |
|---|---|---|
solo | DEL, RMP, GND and TWR | Ground Radar Plugin (GRP), which draws the aerodrome, the parking stands and the ground tags. |
radar | APP and CTR | TopSky, which reproduces a real radar system, with flight plan windows, alerts and vectoring tools. |
In both profiles, transponder codes are handed out by the CCAMS plugin, which prevents duplicate codes between controllers.
Attention!
To switch FIRs, close EuroScope and open the new FIR's profile. Loading another sector while the program is open is not enough.
The main screen
Once the profile is loaded, the screen has the elements below.
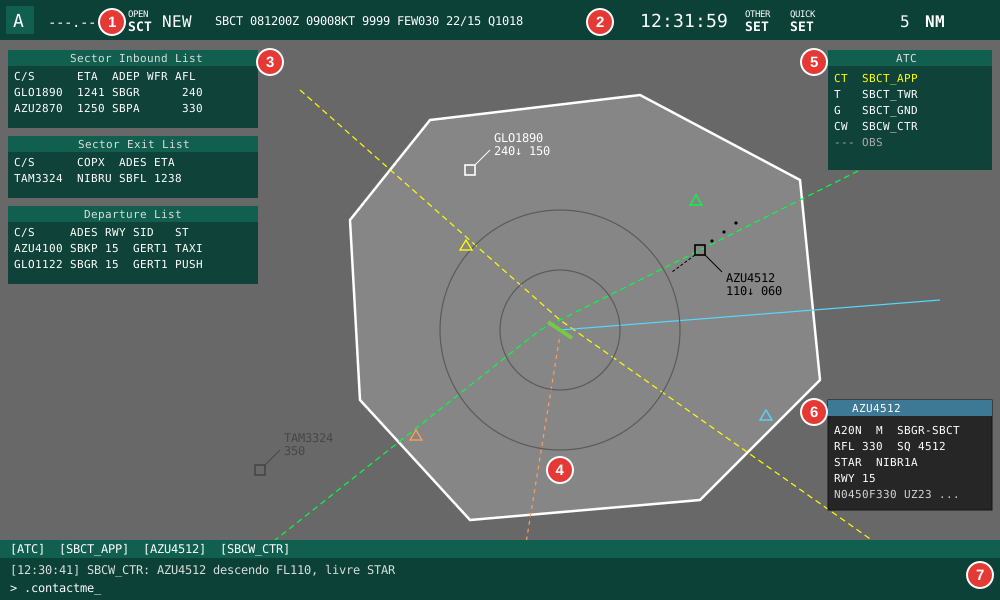
- Menu bar. Gives access to the connection, the sector files (
OPEN SCT), the settings (OTHER SET) and the quick settings (QUICK SET). - METAR and clock. Shows the METARs added with
F2and the UTC time. - Lists. Show traffic entering the sector (Sector Inbound List), leaving it (Sector Exit List) and, on ground positions, the departures (Departure List).
- Radar view. Shows the active sector (white outline), airways, procedures, runways and the targets with their tags.
- Controller list. Shows the connected units and their identifiers. It is used to choose the recipient of handoffs.
- TopSky flight plan window. Shows the plan of the selected traffic: type, departure/destination, cruise level, transponder code, procedure and route.
- Chat and command line. Holds the message tabs (
ATCchannel, private chats and frequency) and the field where commands such as.contactmeare typed.
Sector menu
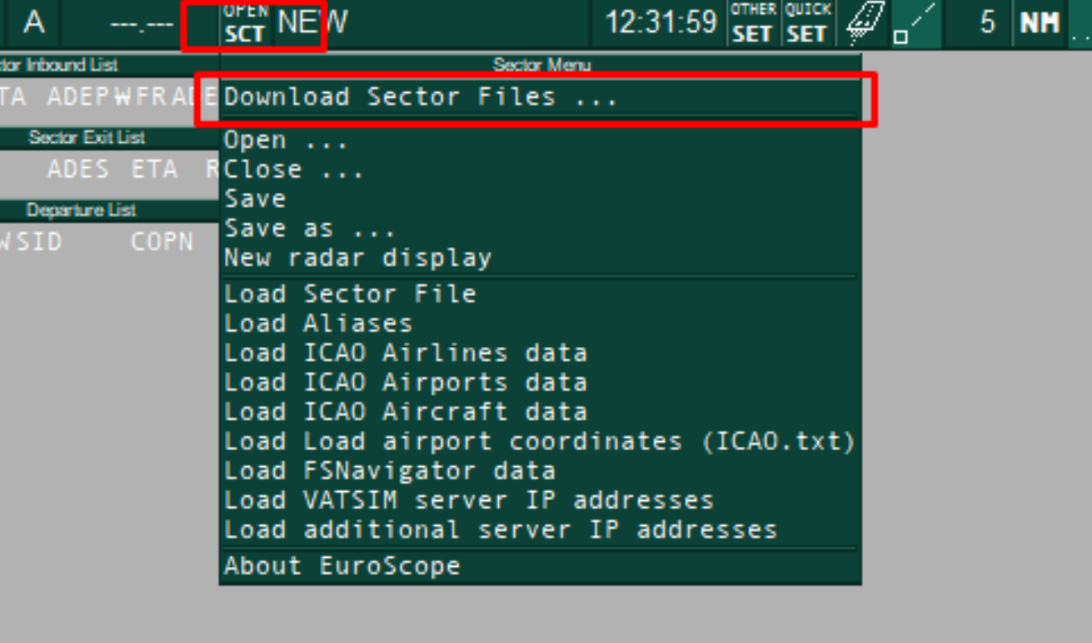
The OPEN SCT button opens the sector file menu. Use it to open another sector or load additional data without switching profiles.
Connecting to the network
EuroScope connects first. TrackAudio and vATIS depend on its connection.
flowchart LR
    A[Open profile<br/>in EuroScope] --> B[Connect<br/>to VATSIM]
    B --> C[Set primary<br/>frequency]
    C --> D[Connect<br/>TrackAudio]
    D --> E[Publish ATIS<br/>in vATIS]
E --> F[Position<br/>operational]- In the menu bar, open the connection menu and choose
Connect. -
Fill in the connection window:
Field What to enter CallsignThe position callsign, for example SBCT_TWR. To only observe, use a callsign ending in_OBS.Real nameYour name, as registered on VATSIM. CertificateYour CID. PasswordYour VATSIM password. FacilityandRatingUnit type and your rating. The network rejects connections to a position above your rating. ServerAUTOMATIC.Connect typeDirect to VATSIM. -
Once connected, open the voice communications setup (Voice Communications Setup, in the
OTHER SETmenu) and mark the position's frequency as primary (Prim). This window also holds the controller information lines (Controller ATIS), shown to pilots who check your position. - Connect TrackAudio and enable
RXandTXon your frequency. - If the position is responsible for the ATIS, publish it with vATIS.
Tip
Before opening a position, check the controller list (item 5 on the screen) to see who is already connected. That tells you whom you will coordinate with and hand traffic off to.
Tags
Each aircraft is shown as a target with a tag. The figure shows a typical radar profile tag.
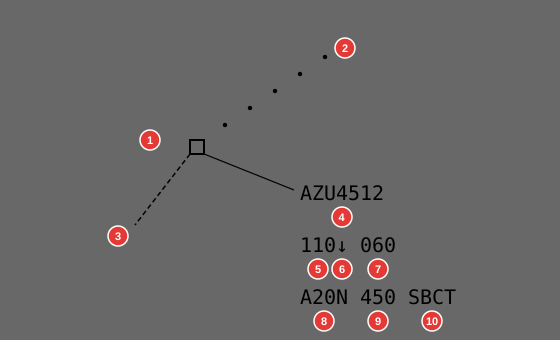
- Position symbol. Marks the aircraft's current position.
- History. Dots with the previous positions, showing the track flown.
- Speed vector. Projects the aircraft's future position at its current track and speed.
- Callsign.
- Current level, in hundreds of feet (
110= FL110). - Trend. Shows whether the aircraft is climbing (
↑), descending (↓) or level. - Cleared level (CFL). Last level assigned by ATC, changed with
F8. - Aircraft type.
- Ground speed.
- Destination aerodrome.
Clicking a tag field opens the matching menu: level, heading, speed, direct routing and so on. These menus are how you record what was cleared on frequency, so other controllers see the same information.
Tag states
The tag color shows how the traffic relates to your sector. The colors below are the ones configured in the VATSIM Brasil TopSky.

- Unconcerned (dark gray). The traffic is not in, and will not enter, your sector.
- Concerned (white). The traffic will enter your sector or there is a handoff to you.
- Assumed (black). The traffic is under your control.
- Coordination (yellow). A coordination about the traffic is in progress.
The normal cycle of a traffic between two sectors is:
stateDiagram-v2
    direction LR
    [*] --> Concerned: traffic approaches the sector
    Concerned --> Assumed: F3 (accept handoff)
    Assumed --> Handoff: F4 + next unit
    Handoff --> Unconcerned: next unit accepts
    Unconcerned --> [*]
    Handoff: Handoff in progress
Radar control routine
- Assume. When the traffic calls, or when the handoff arrives, click the tag with
F3. - Record clearances. Every level, heading or speed given on frequency must be entered in the tag:
F8for the level, or the menu of the matching field. - Monitor separation. Use
F1 + S(.sep) to predict the closest point between two traffics andF1 + D(.distance) to follow the distance to a point. - Hand off. Before the sector boundary, start the handoff to the next unit with
F4. Once it accepts, instruct the pilot to contact the new frequency. - Point out. If a traffic will pass close to another sector without entering it, alert the adjacent controller with
F1 + P.
Attention!
Do not instruct the pilot to change frequency before the next unit accepts the handoff. If it does not accept, coordinate through chat or the coordination channel.
Ground positions: departure list
In the solo profile, the departure list is the main working tool of DEL, GND and TWR.
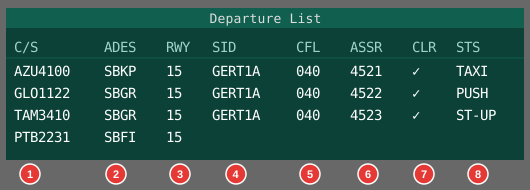
- Callsign. Click to select the traffic and open the flight plan.
- Destination.
- Departure runway.
- Assigned SID.
- Initial cleared level.
- Assigned transponder code (by CCAMS or with
F9). - Clearance (CLR). Mark it once the ATC clearance has been read to the pilot.
- Ground state. Shows which phase the traffic is in.
The ground state is updated at each step, so every position knows where the traffic is and who should call it:
flowchart LR
    A[Flight plan<br/>received] -->|DEL: clearance<br/>CLR marked| B[ST-UP<br/>start-up]
    B -->|GND| C[PUSH<br/>pushback]
    C -->|GND| D[TAXI<br/>taxi]
    D -->|TWR| E[DEPA<br/>departure]
    E -->|handoff| F[APP]
Tip
Before clearing, open the flight plan and check the route, level and equipment. The Flight Plan Manual shows the most common errors.
Inbound and exit lists
On radar positions, the Sector Inbound List (SIL) shows the traffic that will enter your sector, with estimated time and level. It lets you prepare before the handoff. The Sector Exit List (SEL) shows the traffic you have assumed that will leave the sector, with the exit point and time. It works as a reminder of the handoffs you need to start.
Coordination and chat
ATCchannel. Messages to all connected controllers. Use it for general notices.- Private chat. Use
F1 + C(.chat) on the tag to talk to the pilot, or.chatfollowed by the callsign to talk to a controller. .contactme(HOMEshortcut). Asks a pilot to call on your frequency..break. Signals to the other controllers that you need a break or relief.
Closing the session
- Hand off all assumed traffic or, if no unit takes over the area, instruct pilots to switch to the monitoring frequency (UNICOM, 122.800 MHz).
- Announce on the
ATCchannel that you are disconnecting. - Stop the ATIS in vATIS.
- Disconnect TrackAudio.
- Disconnect EuroScope from the connection menu (
Disconnect).
Learn more
- The EuroScope user guide is on the official website, under
Documentation. - The TopSky and Ground Radar Plugin documentation ships with the plugin files, in the FIR package folder.