SBBR - Brasília
General Information
| Information | |
|---|---|
| Aerodrome name | Brasília - Presidente Juscelino Kubitschek |
| Type of Operation | International, Public and Military |
| Transition altitude | 10000 ft5 |
| Elevation | 3498 ft (1066 m) |
| Largest aircraft | Wide-bodies (code 4E) |
| Airspace | Brasília CTR, class C, GND/6500 ft5 |
| Accepts A380? |
Useful Information
Select one of the tools in the tabs above (Charts, Weather or Traffic) to access the aerodrome information.
Runways
Preferential runway system
SBBR has two staggered parallel runways: 11L/29R (3200 × 45 m) to the north and 11R/29L (3300 × 45 m) to the south. The terminal sits between them. H runs along 11L/29R on its south side and U runs along 11R/29L on its north side. All four thresholds have ILS CAT I.
Preferential system
With a tailwind component of up to 7 kt and a dry runway, the runways in use are 11L and 11R1.
With 11L/11R in use and a tailwind, pilots who request 29R/29L should expect a delay in landing or takeoff1.
Departure peaks
Runway data
| Runway | Dimensions | TORA | LDA | Approach | Remarks |
|---|---|---|---|---|---|
| 11L | 3200 × 45 m | 3050 m | 3050 m | ILS CAT I | ALSF-1 and PAPI |
| 29R | 3200 × 45 m | 3200 m | 3050 m | ILS CAT I | MALSF and PAPI. Displaced threshold (150 m) |
| 11R | 3300 × 45 m | 3150 m | 3150 m | ILS CAT I | ALSF-1 and PAPI |
| 29L | 3300 × 45 m | 3300 m | 3150 m | ILS CAT I | ALSF-1 and PAPI. Displaced threshold (150 m) |
- Independent simultaneous parallel operations follow the SBBR-specific AIC1.
ATC Units
| Code | Abbr. | Callsign | Frequency | Remarks |
|---|---|---|---|---|
| SBBR_ATIS | ABR | Brasília Information | 127.800 | D-ATIS |
| SBBR_DEL | DBR | Brasília Clearance | 121.000 | DCL (code SBBR) |
| SBBR_GND | GBR | Brasília Ground | 121.800 | |
| SBBR_TWR | TBR | Brasília Tower | 118.100 | Single Tower |
| SBBR_N_TWR | TBRN | Brasília Tower | 118.450 | Split Tower: runway 11L/29R |
| SBBR_S_TWR | TBRS | Brasília Tower | 118.750 | Split Tower: runway 11R/29L |
Monitor without initial call
SBBR uses monitor handoffs: the pilot changes frequency and does not make an initial call1.
- The pilot calls Clearance from 15 min before EOBT, giving apron and stand. Once the clearance is copied, they report when actually ready for start-up.
- Clearance instructs the pilot to monitor Ground. Ground calls the aircraft for start-up.
- On handoff to Tower, Ground instructs the pilot to monitor Tower. The aircraft waits for Tower's call, ready for an immediate departure.
- Tower does not give the takeoff time. The next unit's frequency comes with the takeoff clearance.
Example: GLO1234, monitor Brasília Ground 121.800.
DCL
SBBR has DCL (departure clearance via datalink)2. On the network, the station code is SBBR.
| Station code | SBBR |
| Who operates it | SBBR_DEL. Without DEL, the position covering clearance top-down (GND, TWR, APP or ACC) |
| Controller tool | TopSky DCL window, with your personal Hoppie ACARS code |
| Pilot tool | Aircraft ACARS or a Hoppie-compatible client, sending the clearance request to SBBR |
How it works:
- The pilot sends the request (RCD) to
SBBR, with the parking stand and ATIS letter. - The controller checks the flight plan and replies with the clearance: limit, runway, SID, transponder code, ATIS letter and next frequency.
- The pilot accepts (
WILCO/ACCEPT). The clearance is then issued and there is no voice readback. - With the clearance accepted, the pilot monitors Ground, which calls them for start-up or pushback.
Controller setup
- Log in to the TopSky DCL with the code
SBBRbefore opening the position. - Announce it in the controller information:
DCL AVBL LOGON SBBR. - A faulty request (invalid plan, wrong SID, no ATIS) goes back as REVERT TO VOICE: the pilot calls Clearance on frequency.
- If the pilot does not accept within a reasonable time, consider the clearance not delivered and call them by voice.
Areas of responsibility
| Position | Responsible for |
|---|---|
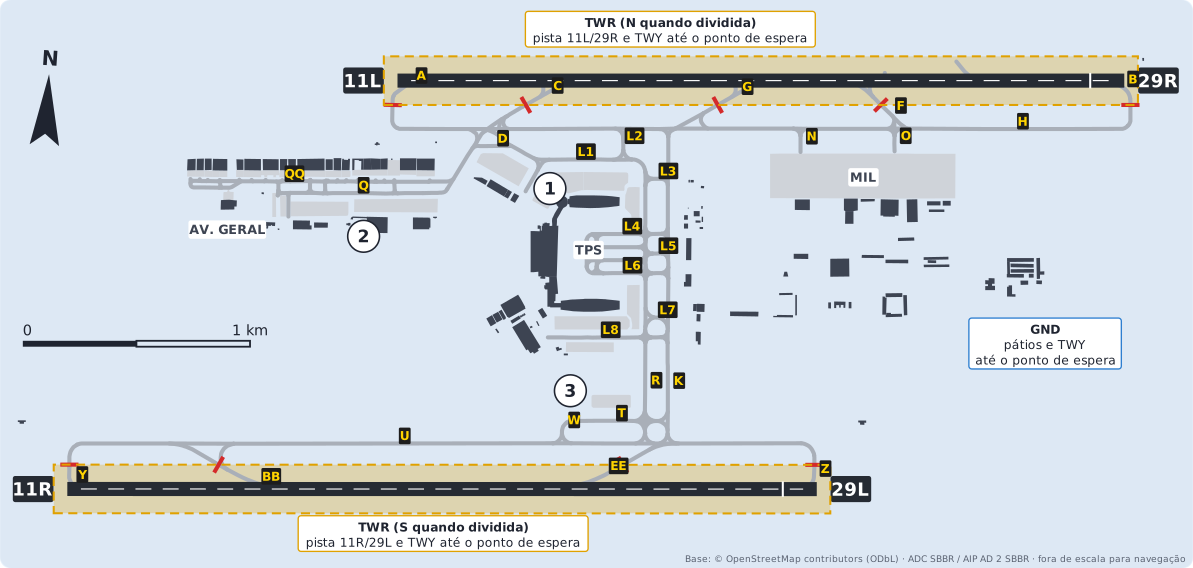
| GND | Aprons 1, 2, 3, general aviation and military, and the TWY up to the holding point |
| TWR | Both runways and the TWY inside the holding points. With a split Tower, N takes 11L/29R and S takes 11R/29L |
- SBBR has no Apron position (APRON): Ground handles all aprons.
- Departures: Ground hands off to Tower (monitor) before the holding point. Pilots reach the holding point ready for departure; if not, they tell Ground1.
- Arrivals: after vacating the runway, Tower hands off to Ground.
- Taxiing between the two sides (apron 1 to U, or U to H) never crosses a runway: it goes along K or R.
Ground flow
General rule
- North side (11L/29R): H runs along the runway. L1 and L2 link apron 1 with H; A and B lead to the thresholds; C, G and F are rapid exits; N and O lead to the military apron.
- South side (11R/29L): U runs along the runway. K and R link apron 1 with U; Y and Z lead to the thresholds; BB and EE are rapid exits; T and W serve apron 3.
- Apron 2 and general aviation leave via Q and QQ to H.
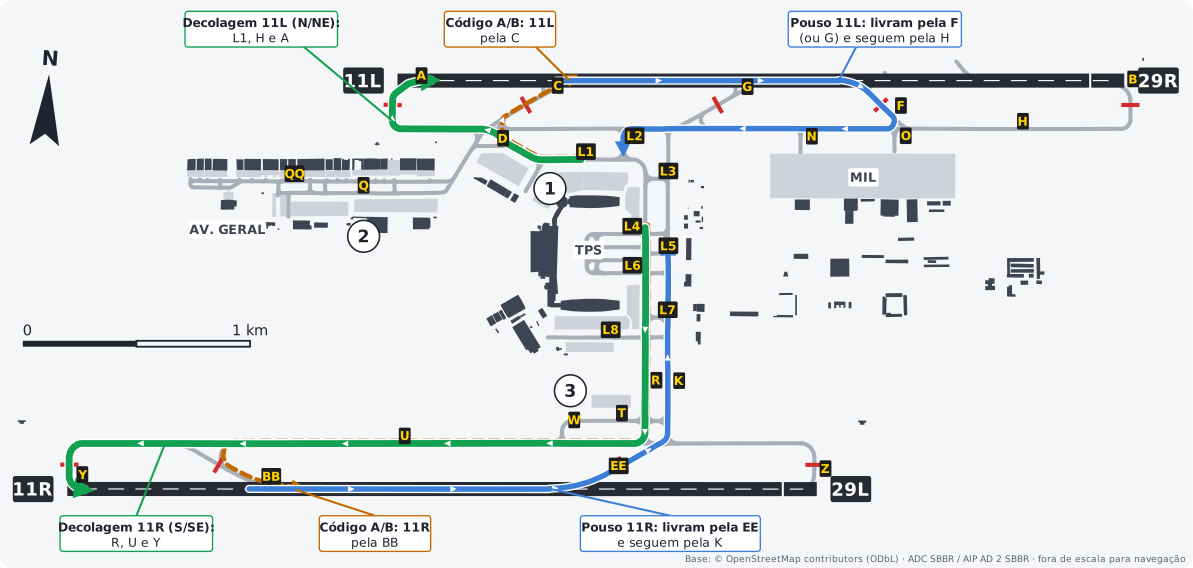
- Departures 11L (N/NE): L1, H and A to the threshold. Code A/B departs from C.
- Departures 11R (S/SE): R or K, U and Y to the threshold. Code A/B departs from BB.
- Landings 11L: vacate via F (or G) and return along H to L2 or L3.
- Landings 11R: vacate via EE and follow K to apron 1.
Example: AZU4321, taxi to holding point runway 11R via R, U and Y.
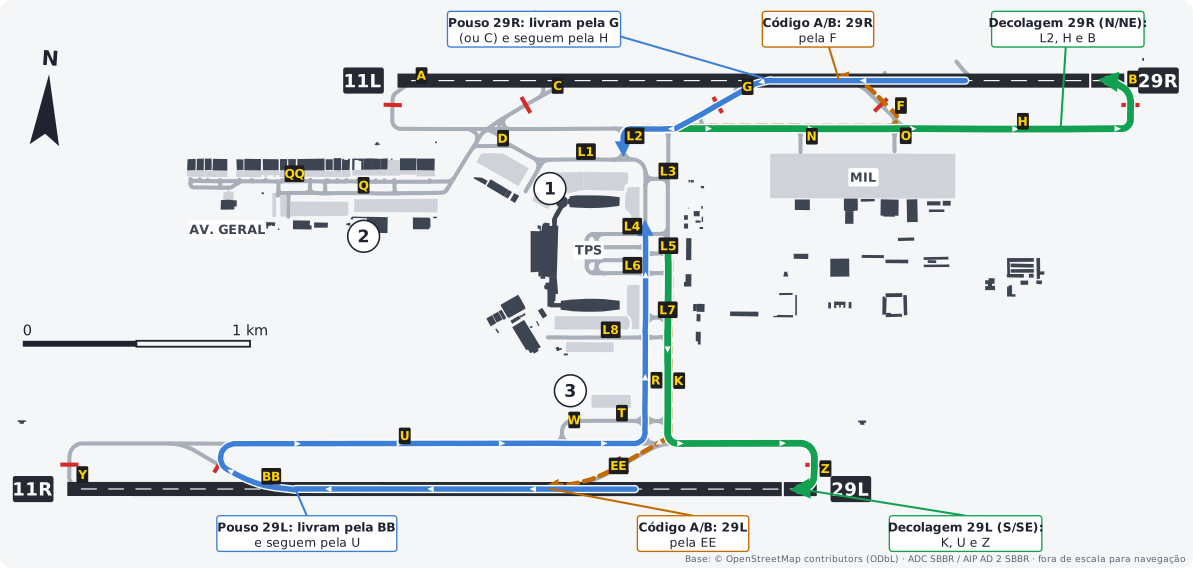
- Departures 29R (N/NE): L2, H and B to the threshold. Code A/B departs from F.
- Departures 29L (S/SE): K, U and Z to the threshold. Code A/B departs from EE.
- Landings 29R: vacate via G (or C) and return along H to L2.
- Landings 29L: vacate via BB and follow U and R to apron 1.
Example: GLO1234, taxi to holding point runway 29R via L2, H and B.
Runway exits
Pilots must vacate the runway completely before stopping, via the listed exit, or tell APP or Tower if they cannot use it1.
| Runway | Exit | Distance from the threshold |
|---|---|---|
| 11L | G or F | 1425 m / 1956 m |
| 29R | G or C | 1359 m / 2193 m |
| 11R | EE | 2161 m |
| 29L | BB | 2188 m |
Hotspots
| Hotspot | Where | Watch out |
|---|---|---|
| HS1 | Where C meets H, L1 and Q | Complex intersection with rapid exit C, next to threshold 11L |
| HS2 | Where EE meets U, R and K | Complex intersection with rapid exit EE |
Taxi restrictions
| Restriction | Where |
|---|---|
| Wingspan up to 20 m | TWY QQ. Before entering Q from QQ, call Tower with your position4 |
| Wingspan above 20 m | To the general aviation hangars via QQ, towed only4 |
| General aviation to apron 2 | Must use the apron 2 taxiway (stands 52 to 61)3 |
Takeoff points
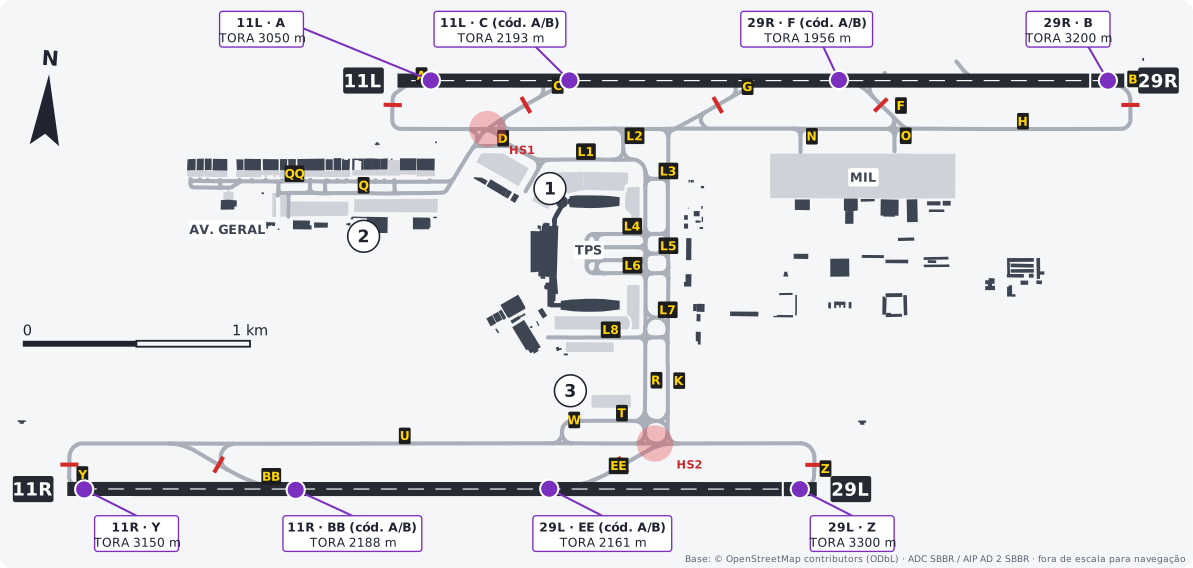
| Runway | Point | TORA | Used by |
|---|---|---|---|
| 11L | A (threshold) | 3050 m | Code C or larger |
| 11L | C | 2193 m | Code A and B1 |
| 29R | B (threshold) | 3200 m | Code C or larger |
| 29R | F | 1956 m | Code A and B1 |
| 11R | Y (threshold) | 3150 m | Code C or larger |
| 11R | BB | 2188 m | Code A and B1 |
| 29L | Z (threshold) | 3300 m | Code C or larger |
| 29L | EE | 2161 m | Code A and B1 |
- Code A and B must depart from the intersection. Those who cannot say so when requesting their clearance1.
- Code C or larger may request the intersection1.
- Pilots reach the holding point ready for departure; immediate line-up and takeoff roll within 10 seconds of the clearance1.
- After takeoff, call APP immediately with only
BRASÍLIA CONTROL, [CALLSIGN], no additional information, and expect vectors or a direct to a waypoint. Pilots planning to exceed 250 kt below FL100 tell APP1.
Departures between arrivals
Subject to wake turbulence, Tower may clear a line-up and immediate takeoff between an aircraft that departed 11L and has crossed the opposite threshold and another that, on approach, is passing over GELVA. It may also clear a line-up between two arrivals: one passing GELVA and another that has crossed the threshold in use1.
HIRO
HIRO (high-intensity runway operations) cuts runway occupancy time to shorten the spacing on final, between departures and between landings and departures1.
| Activation | Broadcast on the ATIS |
| Approach speed | Only aircraft keeping at least 120 kt IAS to 4 NM from the threshold |
| Landing | Vacate the runway completely before stopping, via the exit listed in the runway exits table |
| Takeoff | Code A and B from the intersection; jets and medium wake or heavier follow the high-density procedures (immediate line-up, roll within 10 s) |
Aprons and airlines
Reference for simulation. Stands follow the PDC charts; airlines follow the airport's airline list on Wikipedia. The split between stands is a simplification, not the airport's official allocation. VAs use the stands of the real airline they represent.







Freighters, general aviation up to 5700 kg and overflow from any airline.
Large freighters and overflow.
Logos from GRU Airport. Trademarks belong to their respective airlines.
Other procedures
- Observe the VAC for joining and leaving the traffic pattern1.
- Helicopters enter and leave via the south sector at no less than 4100 ft (600 ft AGL)1.
- Go-around off the IAC profile with communication failure: climb to 7000 ft and, once there, fly towards the IAF of the procedure in use1.
Diagrams drawn by VATSIM Brasil over OpenStreetMap geometry (ODbL), checked against the SBBR ADC and PDC charts. Not for real-world navigation. Normative source: AIP Brasil, AD 2 SBBR, AMDT 2610A1.